Tuesday, July 31, 2007

Wow!!!

I had one of the most exciting experiences of my entire life the other day! I was working on setting up a collage. I had painted the background over the last couple days and was digging in my Random Box for things to put on it. My husband came to talk to me about our daughter. He was watching what I was doing. Then he started asking me about the piece. Next thing I knew he was digging through the Random Box with me, suggesting items to add, placing things on the background and designing it right along with me! And his ideas were really exciting. He even suggested a decorative way to hang it and a neat way to add fringes to the bottom! He picked out a bead to go in the center (a paper bead with the words Day By Day on it, so that will be the title). The creative energy we had going was phenomenal!

I feel very blessed to have such a creative and caring man as my husband.

When the collage is finished, I will post it here.

Tuesday, July 24, 2007

Things I've Learned Today

1. Grapevine beetles are easy to take care of.
2. A razor will cut fabric very neatly if you are cutting around an object.
3. It is a pain in the butt to glue velvet to the inside of a box, especially if you are trying to fold the edges under at the same time.
4. It is fun to paint with your fingers.
5. Glass bead medium over iridescent medium over fluid acrylics looks cool.
6. Sometimes if you leave the parts of your collage out overnight and then look at them again in the morning, you will be able to figure out how to arrange them properly.
7. The right music sometimes makes a difference in how the art goes.
8. An occasional day by oneself is good for one's mental health.

Sunday, July 22, 2007

New Collage--How Can I Reach


I think things must be improving, because now I am going into my studio, sitting down, and simply making things rather than waiting for a challenge or an assignment. Part of the inspiration for this change in behavior is having new things to play with. I got some Golden fluid acrylics at the Art Expo and want to really test them out and compare them to the other acrylics I have used in the past (FolkArt craft acrylics and Jo Sonja's artist gouache). I am also trying to absorb and interpret what I have been learning from Belinda's Collage Composition course which I am taking. So, on this project I started with an acrylic background and collaged other items onto it. The reason for the unique shape of the support (which is matboard) is that is is a chunk of the board I painted Tiger Tiger on awhile back and ripped off. I do have other matboard, but I wanted to use this up "for practice". I ended up really liking the way it turned out, even though partway through I wasn't very happy with it. The only thing I wish is that there was more contrast between the flower beads and the background. I'm considering going back and painting them to make them pop more. What do you think?


BTW, the title comes from the lyric snippet in the sheet music fragment in the lower center.

Weekly Uniquely


I did the Mixed Media Art Newbies Weekly Uniquely. This week we were supposed to do a piece of artwork that was small, but not an ATC. It also had to include a word and its definition. I hadn't originally planned on participating, but then I sat down and painted some random backgrounds on cardboard for practice, and one of them begged to be turned into the Weekly Uniquely. The problem is, once I finished this same item asked to be given to my son, who lives away from home and misses the dog in the picture. So I can't post it to the group as a Weekly Uniquely because I don't have it to trade. But I am happy that I did it and that I successfully used the Golden Fiber Medium that I got at the Art Expo. I'd be happy to have your comments on this simple composition.

Friday, July 20, 2007

Here She Is


I know she's kinda strange-lookin', but here is one of my very favorite drawings done as a laser gel transfer. The edges are kinda abraded because I did this on a cheap piece of cardboard that came with some watercolor postcards instead of doing it on something sturdy. Next time I will do it better. But I am so happy that the image came out nice and clear!

Wednesday, July 18, 2007

Success!

I have been trying to figure out gel transfers for the longest time. In retrospect, it wasn't that hard to do....but it was just real complicated to read about: inkjet vs. laser, different mediums to use, different papers to use, how long to let it dry, etc. etc. I felt overwhelmed by all the information, much of it conflicting. But I asked on my email group, NewLifeThruArt@yahoogroups.com, for someone to clarify how to do a transfer with a black and white printout from a laser printer, and Angela kindly explained it. Now I am not one who likes to try new things unless I feel I know what I am doing, but armed with her explanation printed out, I decided to give it a try using a black and white version of an ink and colored pencil drawing of a woman I did years ago. I applied the gel medium, put the printout on the substrate, burnished it, and let it dry for several hours (the hardest part). When I removed the paper afterwards, I felt like cheering as the image was revealed. It came out beautifully! It's drying now, and tomorrow I will take a photo and post it here (although it will have to be in the evening because I'm volunteering for Quest Adventures tomorrow during the day).

I'm sure almost everyone knows how to do this technique, but if someone stumbles upon this entry who needs the details to try it for themselves, all they have to do is drop me an email and I will pass the info on.

Monday, July 16, 2007

Photos of Samples from Acrylic Encaustics Class


Saturday, July 14, 2007

Reflections on Making Paper Beads

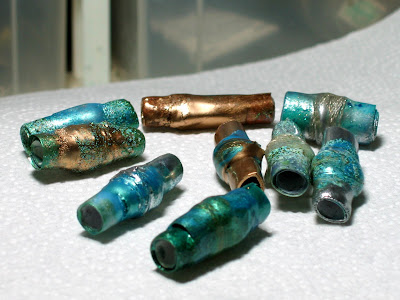
I had read about making paper beads somewhere about 18 months ago and thought it sounded like a cool idea. I used to do lampwork (glass bead making) and gave it up because my hands shake and I got stressed out by working with the torch. I had done lampwork for three years and hoped I would lose my fear of the torch, but I never did--I always felt way too much adrenaline going on while I was working, so it didn't work as a stress-buster, which is what I needed. I thought that making paper beads would be an interesting similar activity and less stressful. I thought it would be fun to be able to pre-pattern the beads with different papers and choose embellishments such as gold or silver thread for them. Then, to be able to use Pearl-Ex or other types of powders for decoration seemed like a fun idea as well.

I bought most of the supplies and set them aside, waiting for inspiration to strike. Well, life got in the way, and I think in the back of my head I was still a little intimidated about working with heat, although let me tell you an embossing tool compared to a torch is like a kitten compared to a tiger! But then I got the new issue of Cloth Paper Scissors and read the paper bead article, and I once again had a desire to give it a try. The completeness of the directions gave me more confidence, too, as I had not been able to find comprehensive directions before. I had never used the heat tool for embossing, you see, so it was a bit of a dilemma.

On Thursday, I sat down with my paper cutter and cut a lot of strips of paper, many different kinds (including watercolor). Most of my strips were one to one and a half inches wide, and about six inches long. Then I sat down in my studio to roll and glue them. That was a challenge because the gel medium I was using kept drying too fast so it was hard to make the end stick. I solved that by adding a little more gel at the end to stick it on. After rolling the base bead, I ripped or cut a shorter, narrower piece of a contrasting paper (or sheet music) to make a center strip. That was easier to do. Finally, after taking a break, I wound silver or gold thread around the center of most of the beads (gluing it down with glue stick).

Then I cleaned off my studio table and set things up for heating and dipping. I took a big roasting pan and lined it with aluminum foil. I dumped a big pile of UTEE in one corner for rolling beads in. I put uncapped containers of different embossing powders in the pan, and dumped a small amount of Pearl-Ex in two different colors in another corner. I got out the embossing pad (which unfortunately was not sticky enough--I ended up returning it to Hobby Lobby later for stickier stuff). Then my daughter and I put masking tape on the ends of the skewers and put some of the beads on them (making sure no wood or tape protruded from the open end). We were ready to begin.

I fired up the heat tool (after attaching the stand so I could put it down if needed), rolled the first bead on the embossing pad, rolled it in the UTEE, and started heating. I was heating just from the center to the outer end, not the whole bead (you do one end at a time). I heated, rolled in UTEE, heated, etc. until the end was well-coated. Then I started rolling or dipping the bead into the powders, heating gently after each time. My daughter helped me by sprinkling stuff on it when I asked her to (because that gives an interesting speckled effect). Each half of a bead took about three to five minutes to do. After doing one end, we kept turning the bead to keep it from dripping; as it cooled, we placed it, skewer still inserted, to rest on the edge of the pan to cool thoroughly. They seemed to need about five minutes to cool. Then we could take them off the skewer, reverse them, and do the other half. In all I think we did twelve beads, though there were more rolled and ready--we got tired after awhile and decided to leave the others for another day.

We did have a few mishaps. The heating element was not well centered in the heating tool and that resulted in some difficulties. I went overboard with the UTEE and got some drips (thus working over the pan was helpful). I touched the hot bead to the edge of a container a couple of times and had to re-melt it and add more UTEE or powder to cover the divot it made. And it was a big mess (which I expected). But overall it was great fun. I will do it again soon. And this time I will make some beads out of BLACK paper! Yeah! That will be gorgeous with gold and silver and sparklies......

Art Expo

I went to the Dick Blick Art Expo yesterday. It was pretty neat. I took the Acrylic Encaustics class at Belinda's suggestion (thanks!). I am a newbie when it comes to acrylics, so to me the info was mostly new. I got to see and work with a bunch of different mediums.....fiber medium, crackle medium, glass bead medium, extra heavy matte gel (which looks kind of like wax/encaustics when dry and can be scraped into before it sets up for similar types of markings). We did a lot of samples in class. It was a little hectic and disorganized, but basically worth what it cost (especially since they sent us home with sample jars of three mediums and small bottles of four paint colors). I plan to photograph my class samples for those who are curious, so let me know if you are interested in any of those.

After the class, I went to the Golden booth in one of the two exhibit halls. Everything was 40% off, which was very nice. I bought larger jars of four of the mediums, a set of ten colors of liquid acrylics, and larger bottles of my four favorite colors (two of which are interference....sort of like dichroic glass, with which I am and always will be in love).

Overall, despite my unhappy stomach (allergy problems, ugh) it was a very nice day and a good learning experience.

Thursday, July 12, 2007

Paper Beads


Not much time to write tonight--taking a class at the Art Expo tomorrow--but I wanted to quick post the pics I took of the paper beads my daughter and I made tonight. I'll write more about them soon. What fun!


Wednesday, July 11, 2007

Stop This Crazy Thing!


No, not really....I'm having a great time. Summer break is really agreeing with me, I am over the worst of my perfectionism (I hope), and I'm creating up a storm. I am on my third series of ATC's (the new ones are on black paper). I am caught up on my Collage Composition homework (whew, that gave me fits, especially the photography......I wanted to throw hubby's camera and my computer out the window!!!) and I have actually finished my Wemic (an imaginary creature I drew for the Fantasy/Sci-fi forum on WetCanvas, where I am a guide). She didn't turn out half-bad, though she has a vacant expression due to her eyes being too big. My daughter has ATC fever too, so we are always running in and out of each other's rooms showing each other stuff. And my Random Box is almost full. What is a Random Box, you ask? Well, to answer that I have to tell you a little story. In a past life, I was a beader/jeweler and made tons of jewelry, much of it with beads. I was forever having leftover beads from projects. What to do with them? Well, I read in a magazine that you should stick them all in a box and call them Bead Soup and use them when you wanted to do a project with random beads. Well, that was just fine by me and I had lots of bead soup. Still do. It's wonderful stuff, very inspiring when you're not exactly sure what to add. Well, when I got into altered art about six or so weeks ago, I instantly began collecting stuff (well, I had already collected a lot of stuff as I am a bit of a pack rat and a magpie and love shiny things). I started sorting it and putting it boxes and drawers. However, as I began doing collages and ATC's, I found that a lot of times I couldn't remember what all I had and would finish something and reaize I had not embellished it as thoroughly as I would have liked because I wasn't inclined to dig through all those boxes and drawers. The solution? The Random Box. I have spent the past week throwing lots of bits and bobs in an old jewelry tray container I have (which is about 18" high by 8" wide by 18" long). Now when I am making something and need to decorate, I just reach in there and grab something randomly. If it doesn't work with what I am making, i put it back and grab something else (usually without looking). Usually by the time I have grabbed 3 or 4 things I have some good stuff to incorporate. You might wonder what all I have put in my Random Box. I have put in: beads, wire, old wire rings (can be smushed or trimmed to make a nifty decoration) ribbon bits, all kinds of paper bits, cut out images, fabric snippets, bottle caps, tags, rosettes, pendants, chain, old single earrings, ticket stubs and other random paper stuff, texture materials such as rug hooking canvas, plastic canvas, old parts from various machines, bits of old craft projects, glass squiggles, marbles, torn-up abstract watercolor paintings (painted to be incorporated into other projects), charms, jump rings, and on and on and on. This really sparks my creativity, but I'm sure it would be a neat freak's worst nightmare. It's funny because the rest of my studio is really quite organized....but this little bit of chaos really makes me happy because you never know what you're gonna get when you reach inside......

Tuesday, July 10, 2007


Sigh....Blogger doesn't want to let me put a title on this, but the title would have been "Micro Twickie". I know that's a weird title. A little background: I am working on my first altered book, and I wanted it to be fun and full of good memories. We have a dog whose name is Daphne, but who usually gets called Twickie (don't ask). She is a wonderful dog, sweet and very therapeutic to have around because she is a good listener. Any of you who have had a really good dog know what I am talking about. Anyway, before we brought her home we went to visit her at the home of the people who owned her parents. Side note: she is not a dog from a "real" breeder; her parents were never supposed to breed. So I consider her a rescue, although that is stretching the label a little bit I guess. Anyway, we have pictures of her from when she was very small, so I decided to make a book about when she was really little, hence the title "Micro Twickie". The above pictures are of the cover and the first spread. I know they look a little scrapbooky, but I'm trying to work on that. I would be very interested in other people's observations and suggestions. BTW, the drawings were done by my teenage daughter, Tasja.


Sunday, July 08, 2007

New ATC's


I have had a bit of a revelation. ATC's are fun! I know YOU knew that, but after creating a "monster" with my second one, I wasn't so sure. For me there's nothing like plunging ahead to get over that creative block, so I sat down Friday night with a bunch of blank cardstock ATC's and just started working. I picked two colors of acrylic paint almost at random (some kind of chocolate brown that the label had worn off of and a bright raspberry color) and started slinging paint. Then I started doing different things to different cards--a sticker here, some glass paint (sort of a butterscotch color) there, some gold leaf, and so on. Of course there was some drying time in there too. And I had to go back and glue a second ATC to the back because the cardstock should have been thicker. But still, I got over my fears and had a really good time. My daughter even wanted one of them, and she is notoriously picky about art! (And I think she picked the best of the lot....that's my girl).


Wednesday, July 04, 2007

Late on the 4th

I should be in bed, given that I'm not feeling well, but I'm sitting up waiting for my teenage daughter to come back from our local fireworks display. So I thought I would give an update.

The last thing I finished was a fugly (daughter's term) ATC--my second--which I made for the arttechniquesatc list's moon challenge. The theory of how I did it was okay, I think--started with paint swatches on cardboard, ripped the green one into a foliage border shape and cut that and the blue one to ATC size, then applied a "full moon" (my thumbprint in white stamping ink), and added stars and moon edging with iridescent glass paint. But then I decided to use the green stamp pad and my thumb to add visual texture to the foliage with prints. Bad idea. Then things got worse as I decided the scene needed a bird. Well, it was a night scene, and the bird I added (leather cord tied in a knot) looked totally out of context. Then there was this empty space in the middle, so I glued on a Zuni bear bead my daughter found in my bead soup.

Well, the whole thing was really ugly, but I went ahead and posted it anyway (but I'm not going to post it here--I'll spare you). At first I was really annoyed and embarrassed, but then I realized that I had learned some things from the experience--leather cord does not flatten when glued to an ATC if it is in a knot; fast and messy looks, well, fast and messy (usually); and there is an upper limit to the amount of E6000 you want to use with a bead even if you want it to hold good and tight. Plus you have to be very careful picking sky colors. So it wasn't a wasted experience by any means. I also thought about what I learned from Art and Fear--in any artist's work there will be great stuff, good stuff, average stuff, and stinkers (my term, not theirs). And if you do enough work, you will produce stinkers, especially when learning new techniques or flying by the seat of your pants.

So, it's chalk one up to experience and move on to bigger and better things! Like the Micro Twickie book I am working on (my first altered boook), which unlike the fugly card is coming along and looking decent enough considering it's my first (my struggle being to keep it from looking too scrapbooky, which it probably still does). Well, that's a topic for another day.